 Turkey Red Journal
Painting with Indigo
by John Marshall
We are all familiar with the long and rich legacy indigo brings to the human experience of color in nature. But how many of you, as dyers and as fiber artists, are familiar with painting with indigo?
All forms of natural indigo fall into the category of pigment dyes. These are topical dyes, and include most mineral dyes, such as African mud dyes and Japanese ganryo. By virtue of the fact that they are topical, pigments are very easy to apply in paint form on just about any surface, including textiles. Pigments, however, do require a binder of some sort to make them permanently grab hold of your fibers. In this article, I will describe the use of soymilk for this purpose.
The binder: Soymilk is made from soybeans. Soybeans contain the highest percentage of protein of all legumes. To make soymilk, simply soak a handful of dry beans in tepid water for about three hours, or until fully swollen. Rinse and place in a blender. Fill the blender 4/5 full of cold water, and push the high or liquefy button. Froth will form on the surface of the liquid. Pour the contents through a rag.
The liquid that flows through the cloth is your soymilk, the crumble left in the rag may be used in Japanese country cooking as okara, used in your favorite recipe as additional roughage (up to 20% won't change the flavor or texture of most dishes), or tossed in the garden as compost. The consistency should be about the same as 2% milk. Add water to thin if necessary. For further information, consider reading Salvation Through Soy (http://www. johnmarshall.to/8-01-SOY.html)
The sizing: I always recommend a layer of soymilk sizing be applied to all weaves before beginning to paint. You may do this with a sponge or a spray bottle, but if you want consistent and streak-free results, I recommend the brush traditionally used for this step, the Japanese jizomebake (www.JohnMarshall.to/8-RETbrushes.html). Applying soymilk as a sizing will prevent wicking and allow for much richer color, while at the same time reducing crocking. (CAUTION—see the note at the end for more information about soymilk sizing as it relates to indigo vat dyeing.)
The pigment: You will need oxidized indigo. The most accessible source for most of you will be the froth of bubbles that form on the surface of your indigo fermentation vat, the aibana. This is the reduced indigo that has come into contact with the air and oxidized. Simply scrape it from the surface and use it wet or dry.
Another reliable and consistent source is ganryo pigment from Japan made from Japanese indigo. This is basically an indigo lake. Add a little soymilk to the pigment, and you are ready to paint. Any watercolor brush will do to apply the pigment, as will sponges, crumpled paper, or bare feet. I use Japanese brushes called surikomibake (www.JohnMarshall.to/8-RETbrushes.html #anchor1627804) for most of my work.
From this point on, work with the indigo/soy mixture much as you would paint with watercolors. The sizing will give your weave a stiff, paper-like surface upon which to work. (If properly applied, the stiffness will go away once the work is completed.) Images 2-5 will give you a rough guide, starting with the lighter shades and working up to the deeper tones as layer upon layer is applied. I tend to work with a moist or nearly dry brush, rather than a wet one.
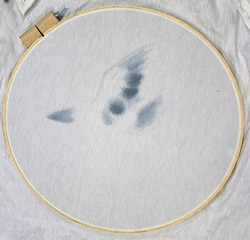
| 2. Fabric stretched in an embroidery hoop and sized with soymilk. Beginnings of bird outline sketched in with pale indigo. | 3. Layers of indigo/soy are built up to create darker tones as the image takes shape. |
 |
 |
| Photograph Copyright by John Marshall | Photograph Copyright by John Marshall |
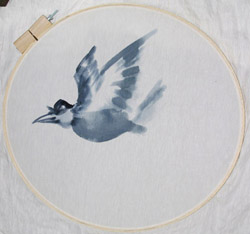
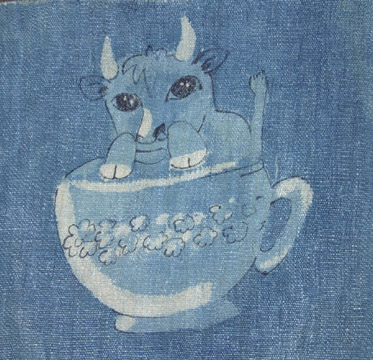
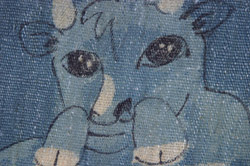
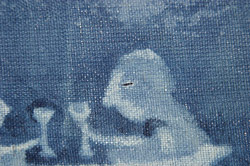
| 4. Completed bird on branch. | 5. Detail of head. |
 |
 |
| Photograph Copyright by John Marshall | Photograph Copyright by John Marshall |
The final steps: The one drawback to using a natural protein is that it requires curing. Curing involves oxidation of the protein, which takes it from a water-soluble protein, to a non-water-soluble protein-polymer. Once cured the indigo will not crock and will remain washable. It does no good (nor any harm) to steam the dried soymilk. The safest method is to simply let the fabric sit exposed to warm dry air. I recommend a minimum of four weeks curing for quality work, but some artists will pare this down to just a few days and still have very good results.
Once the soymilk dries you may handle it with ease, even sewing with it if you like. However, it will remain somewhat stiff until you wash it once. Washing does not remove the soymilk, it simply softens the fabric.
Indigo painting may also be combined with vat dyeing and resists. In figures 6-7 and 8-9, I have used rice-paste resist (http://www.johnmarshall.to/5-EDx-RicePasteRecipe.html) along with multiple dunking to create my imagery. In both cases, the rice paste has been applied with brushes. As a final step I have painted in deeper lines and details with my indigo/soy mixture and a mensou brush (a 00 watercolor brush is a fine substitute).
| 6. Moojo. Vat indigo on woven nettle. | 7. Detail showing painted indigo highlights. |
 |
 |
| Photograph Copyright by John Marshall | Photograph Copyright by John Marshall |
| 8. Old Friends. Vat indigo on Russian linen. | 9. Detail showing highlights applied before dipping, as well as painted eyelid. |
 |
 |
| Photograph Copyright by John Marshall | Photograph Copyright by John Marshall |
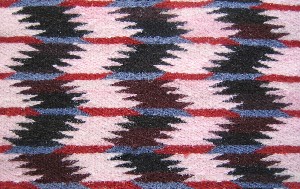
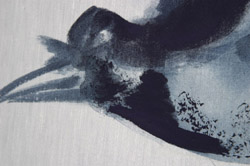
Taking it a step further, consider combining natural indigo with other natural pigment/soy mixtures as I have done in figure 1.
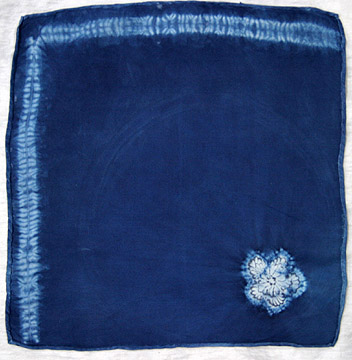
Equally interesting results may be achieved by combining the painted indigo with tie-dye, shibori. This combination is what is referred to as tsujigahana. See figures 10 and 11.
| 10. Shibori and vat dyed silk handkerchief—tsujigahana. | 11. Detail showing painted indigo/soy highlights. |
 |
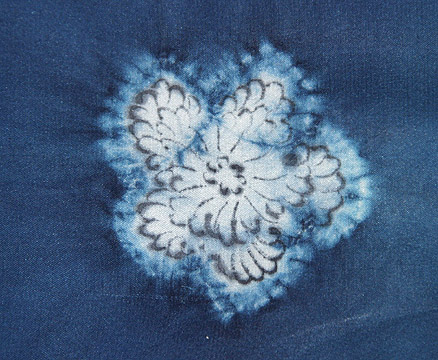 |
| Photograph Copyright by John Marshall | Photograph Copyright by John Marshall |
For John's teaching schedule, supplies, and more "how-to" information, please visit www.JohnMarshall.to.
End Note - Soymilk Sizing
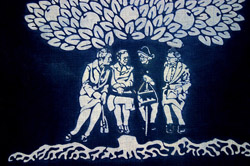
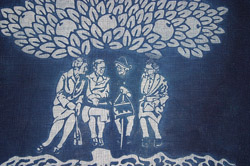
Keeping in mind that the more absorbent the fiber, the better the color takes with indigo vat dyeing. If you size your yardage with soymilk before dunking it in the vat, the soy sizing will retard the dye, perhaps yielding uneven, or at least lack-luster coverage. This isn't necessarily a bad thing. Take a look at figure 1, in which I have again used rice-paste as a resist.
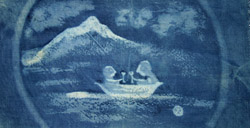
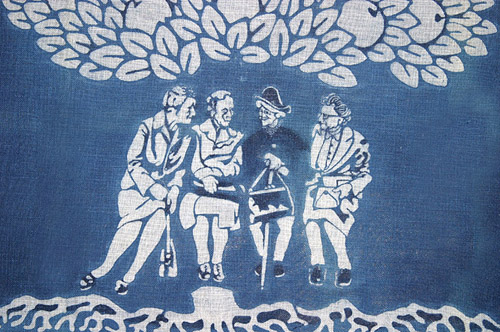
Figure 12 was dipped multiple times into the vat, with no sizing applied. Figure 13 shows the same image on the same weave with the same number of dips. However, this time soymilk was applied only to the areas of the leaves, trunk, and seated figures (not the entire surface of the cloth). The results are quite interesting, giving a certain warmth and intimacy to the piece.
| 12. Unsized. | 13. Soymilk sizing applied only to the areas of the leaves, trunk, and seated figures. |
 |
 |
| Photograph Copyright by John Marshall | Photograph Copyright by John Marshall |
Figure 14 shows fabric treated identically to the piece shown in figure 13. The only difference is that highlights of soymilk/indigo were applied with a brush over the paste before dipping into the vat. The highlights give even greater depth to the imagery.
NOTE: If you are having problems with your indigo work crocking, take the following simple step to remedy the problem: Once your fabric is completely dyed and washed, give the entire piece a coating of soymilk sizing. This will lock in any un-affixed particles of pigment and reduce, or entirely eliminate all crocking in the future.