 Turkey Red Journal

Tinctoria Gardens
By Heather Clark Hilliard
Part 1: Introduction
There are many dye plants that can be grown in temperate regions and many of these can be grown from seed. The successes and failures of growing dye plants are determined by a variety of factors. Such factors include climate, soil, moisture, time, energy, and attention. This especially is the case when starting with seeds.
I find working in my gardens to be meditative, but at the same time, I find myself anticipating the following years, as gardens change and mature; everything grows, everything dies. Many gardens ago I was influenced by Masanobu Fukuoka's, The One Straw Revolution, which presents ideas about the permaculture, natural farming and minimalist gardening approaches that work with different ecosystems, and not against them. These practices include, but are not limited to, organic gardening methods, using compost as fertilizer and being aware of water and other resource usages. Over time, my various garden beds have been an evolving mixture of bulbs, herbs, vegetables, perennials, annuals and other volunteer flowers. Natural plant dyes are an obvious addition. Paying attention to what grows well in my garden, in my dirt, and with my cycle of day-to-day living, is my way of gardening.
The goals I have for Tinctoria Gardens are to identify dye plant species, and develop a sense of species characteristics; to understand various growing conditions, and determine which species would be best for producing beautiful colors for my garden dye pots.
Oklahoma has four plant hardiness zones: 6a, 6b, 7a and 7b, with low temperatures ranging from -10 to +10 degrees Fahrenheit (-23.3 to -12.2 Celsius), making the variety of plants that will survive and thrive here quite diverse. USDA plant hardiness zones are helpful when determining what to grow in specific climates. Listed by Latin name, common name, dye colors, establishment, and plant hardiness zones, below is the list of dye plants I am currently growing:
1. Alcea rosea, Hollyhock, nigra cultivar, yellow and pink, biennial, zone 5.
2. Calendula officinalis, Calendula/Pot Marigold, pale yellow to olive, annual, all zones.
3. Coreopsis grandiflora, Coreopsis, yellow and tan, perennial, zone 5.
4. Dahlia sp., Dahlia hybrids mixed colors, yellow and orange, grown as an annual, all zones.
5. Helianthus sp., Hopi Black Dye Sunflower strain, grays, annual, all zones.
6. Isatis tinctoria, Woad, blue, biennial, zone 3.
7. Polygonum (Persicarius) tinctorium, Japanese Indigo, blue, annual, all zones.
8. Reseda luteola, Weld or Mignonette, yellow, biennial, zone 3.
9. Rubia tinctoria, Madder, red and orange, perennial, zone 4.
10. Tagetes patula, French Marigold, yellow, annual, all zones.
11. Tanacetum vulgare, Tansy, yellow, perennial, zone 4.
Part 2: Starting Seeds
Some seeds came from my treasure trove of old seeds, while others are volunteers already established in my gardens. This last category includes an overabundance of Zinnias and Coreopsis. The "classic core" dye plants were purchased earlier this year from Liesel Orend, owner of Earth-Arts, and most of the seeds were saved from her dye garden. These include Isatis tinctoria (Woad), Polygonum (Persicarius) tinctorium (Japanese Indigo), Reseda luteola (Weld), Rubia tinctoria (Madder), and Tagetes patula (French Marigold). I am still waiting for Tanacetum vulgare (Tansy) to arrive via mail.
Although there are many reputable seed companies, dye seeds can be hard to find in garden catalogs. Latin names are vital to properly identify the dye plant species. Richters Seed Company in Canada and Chiltern Seeds in Britain seem to have a wide selection of dye seeds and utilize Latin names.
The main advantage to starting multiple dye plant seeds in a single 4" pot is the ability to clearly identify the dye plant sprouts as they emerge. Directly sewing seeds is an efficient method if you are familiar with your garden ground and the characteristics of the seedlings. Otherwise, the new sprouts can easily be lost to aggressive sprouting weeds. At the same time, starting seeds indoors can also be troublesome. Once germinated, the fragile seedlings never seem to get enough light and moisture, and can be difficult to monitor and control. When the seeds are too wet there is a risk of "dampening off" from fungus, which causes new seeds to rot. The next best solution, other than a greenhouse, is a seed-starting frame. This is an ideal way to start healthy seedlings in early Spring, before the last frost date.
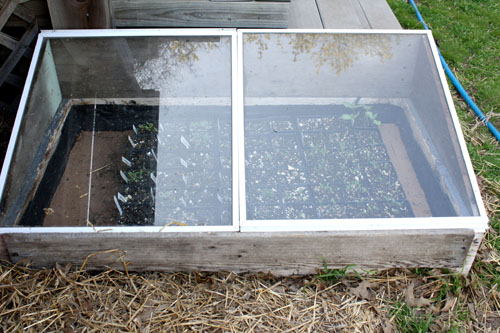
Like a "cold frame", the seed-starting frame is covered with glass and can be placed outside on the ground in a sunny location, preferably facing south. The bottom of the frame is lined with sturdy hardware cloth, then covered by a layer of landscape fabric, then a layer of sand is laid over this, followed by a heating cable, (which can be ordered from Johnny's Selected Seeds) and finally covered with more sand. The heating cable requires an electrical outlet and an extension cord. Damp sand retains moisture and heat, creating a protective and encouraging environment for germinating seeds and growing seedlings. Heat assists germination rates and helps new seedlings grow safely past the last frost danger date, assuring that the environment does not get too cold. The seed-starting frame with a heating cable allows for flexibility in changing climates. When the days are warm and calm, the glass windows can be opened for ventilation, or removed, allowing the seedlings to acclimate. During inclement weather, the glass cover protects the seedlings from harsh climate changes like hard rain and even hail. The seed containers rest on the floor of the seed starting frame, providing good drainage.
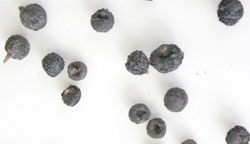
| Rubia tinctoria (Madder) seeds | Tagetes patula (French Marigold) seeds |
 |
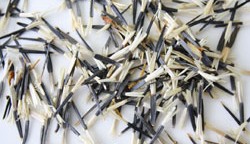 |
| Photograph Copyright by Heather Clark Hilliard | Photograph Copyright by Heather Clark Hilliard |
It is important to place plants in locations suitable for each species' requirements. Since individual plants have evolved within specific soil and climate conditions, we as gardeners must try to mimic these conditions as closely as possible. Observing these qualities, characteristics and micro- climates in our own gardens is important for finding the best habitat for each species. Knowing the characteristics of a species, whether annual, biennial or perennial, also aids in determining where to plant them in your garden. Some plants re-seed themselves abundantly, happily spreading volunteers all over the garden. This can be desirable or disastrous depending on the garden and the gardener.
Part 3: Seed Germination
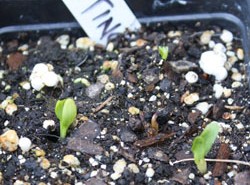
I love observing the process of germination; it is life unfolding before your eyes! The process is mysterious, but still requires some "basics" such as light, oxygen, and moisture. Life is pushing through, breaking the outer shell. Generally, two cotyledons are encased within the hard shell of the seed. These are the food storage that supports the seed as it emerges. As the seed absorbs moisture, the outer shell softens, eventually causing the cotyledons to swell, pushing open the encasement. The radial pokes out first, being pulled downwards by gravity. When the plumule emerges it pushes upwards through the soil. Think of yin and yang, black and white, opposite forces at work. Soon the radial makes rootlets, (I love this word) and the leaves form on the plumule—the above ground part of the plant. Now the plant is independent of its food source. Notice in some of the germination photos that the seed is still bound to the new leaf.
| Rubia tinctoria (Madder) germination | Polygonum tinctorium (Japanese Indigo) germination |
 |
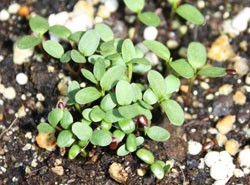 |
| Photograph Copyright by Heather Clark Hilliard | Photograph Copyright by Heather Clark Hilliard |
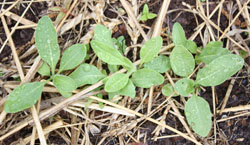
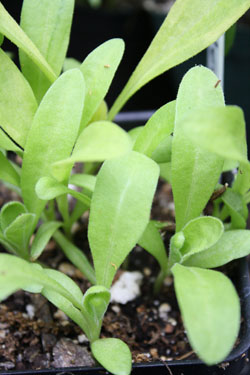
| Isatis tinctoria (Woad) seedlings | Tagetes patula (French Marigold) seedlings |
 |
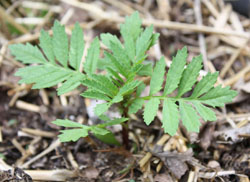 |
| Photograph Copyright by Heather Clark Hilliard | Photograph Copyright by Heather Clark Hilliard |
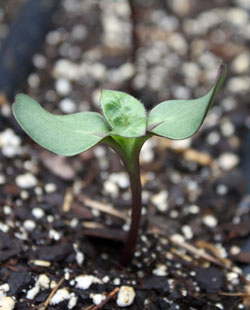
| Helianthus sp. (Hopi Dye Sunflower) seedling | Calendula officinalis (Calendula/Pot Marigold) seedlings |
 |
 |
| Photograph Copyright by Heather Clark Hilliard | Photograph Copyright by Heather Clark Hilliard |
Part 4: Transplanting Seedlings
Transplanting seedlings is an overwhelming as well as an exciting time in any garden. Even after years of gardening, it seems there is inevitably not enough room for all the seedlings I greedily grew. Gardeners make great friends. We share plants and we are often able to find "holes" in our gardens for all those extra dye plants!
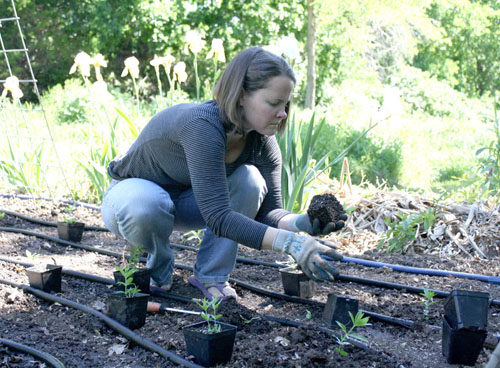
Healthy new seedlings are bursting with energy. Once they are showing their true leaves, but not so big they are fighting with one another, it is time to divide them. When dividing plants I either plant them individually in 4" pots or transplant them directly into garden ground, and there are several factors that determine which is best at the time. First, is the garden ground ready? All too often, the answer is no. Has the last frost date passed? Is the species sensitive? It may be beneficial to allow the plant to establish itself in a small container, growing a stronger root system, before being transplanted directly into the soil. Some seedlings are unfazed by being divided, transplanted, and replanted again, whereas others are in shock for a couple of days, but recover beautifully. Still, there are some plants that simply do not like to be moved, and they may die or continue to struggle. I think of people being moved, sometimes we take it well, sometimes we don't. Plants are no different. Many of these responses are predictable, but there can be surprises. Characteristics are important to recognize and respect for each garden and plant species. Finally, a reminder: all plants need a good drink once they have been moved.
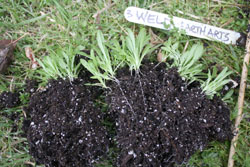
Transplanting also allows for observation of species' root systems, affording a view of plant parts not often seen until harvesting the full size plant. When seeds are directly sown into the garden soil, the seedlings will need to be thinned or spread out because they may germinate too closely to one another. Woad, Isatis tinctoria, was the only plant I directly sowed this year. Weld, Reseda luteola, one of the slower dye plants to germinate, is usually recommended for direct sowing, but I was concerned about not being able to identify the seedling, so I planted them in the seed-starting frame. Once the seedlings were ready for division I transplanted about a dozen into the prepared garden bed and I also individually planted some in 4" pots. Although they needed a couple days to recover from their move, and the cloudy, cool days helped, both methods proved successful. Weld has a tap root which will eventually make transplanting too difficult.
| Author transplanting Rubia tinctoria (Madder) | |
 |
|
| Photograph Copyright by Heather Clark Hilliard | |
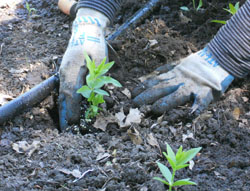
| Transplanting Rubia tinctoria | Reseda luteola (Weld) root system |
 |
 |
| Photograph Copyright by Heather Clark Hilliard | Photograph Copyright by Heather Clark Hilliard |
| Polygonum tinctorium (Japanese Indigo) seedling | Polygonum tinctorium root system |
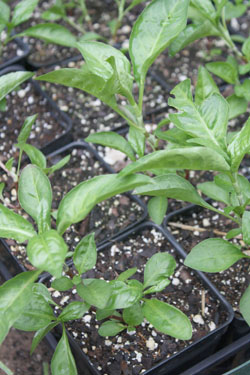 |
 |
| Photograph Copyright by Heather Clark Hilliard | Photograph Copyright by Heather Clark Hilliard |
Even though I cannot share my seedlings with you, I can share my Tinctoria Gardens progress and all the ebbs and flows that await me. Check in on my summer growing progress in the Fall Issue of the Turkey Red Journal. Happy Gardening!