 Turkey Red Journal
Yellow
By Jennifer Ratcliffe
Progressing through historical and contemporary research and experimenting with weld to produce a color I've never taken a shine to was a year-long project.Two friends and I have been following our own "12-step program" to find love for the color "yellow." Before this project, we had made it to Step 3: Admitting "yellow" is a color. Will this year-long experiment help me work my way to step 12, LOVE of the color yellow? Here's what I did and how I did it.
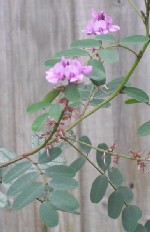
| Weld growing in Florida | ||
 |
||
Photograph Copyright by Jennifer Ratcliffe |
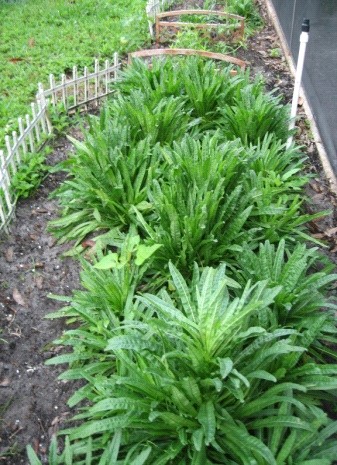
Along with a spinning, weaving, knitting and general thread-art addiction, I have been a natural dyer for 25+ years and have purchased and used English weld for nearly as long. A move to Florida, however, prompted me to grow my own. General theory says it can be easily grown, although from personal experience weld seeds are difficult to germinate and are not the happiest of plants if it is necessary to transplant them: they will wilt and droop at first, but given a couple of days and a bit of TLC, they will come back to life. In the United States, weld can be grown either as an annual in northern climates or as a biennial in warmer areas. The Florida "sand" was well fortified with home-grown compost; seeds were planted, the sun shone and the weld didn't mind our recycled lawn/garden water that is high in sodium compared to general tap water.
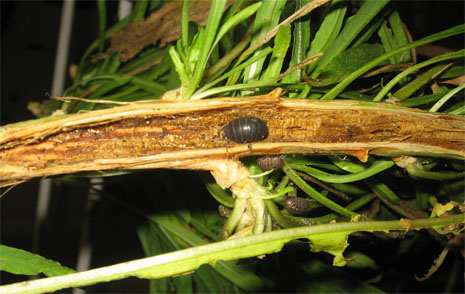
The garden was packed with big, healthy plants when disaster struck. One fell limp and within a day, was lifeless as the rest stood tall. The once green leaves were browning; nearly brittle. The next day, a second fell to the same fate. I dug the earth around them and discovered snails had come to live in my soil. Slicing one of the long tap roots in half, I found "bugs" and knew they were the culprit, sucking the life out of my weld.
Commonly called Roly-Poly, Armadillo or Pill bugs, a more thorough investigation of my soil proved I had a serious problem. Rather than lose any more precious plants, I pulled up every one (50 in all), large and small.
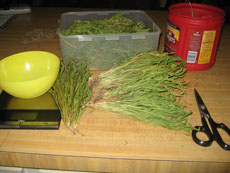
The total weighed about 3-pounds including tap roots. After rinsing off excess dirt, I cut most of the tap root off and hung them like herbs on a clothes rack to dry in a dark corner and for the first 2-weeks I had a small fan in the area to circulate air.
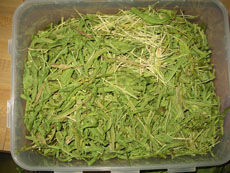
After four weeks, the bundles came down, the rest of the tap root was cut off and finally, using heavy duty kitchen scissors. I cut the leaves into approximately half-inch pieces. I ended up with 21 ounces. Love it or hate it, I was going to dye with it and a lot.
| Drying weld | Preparing the weld | Cut-up weld |
 |
 |
 |
| Photograph Copyright by Jennifer Ratcliffe | Photograph Copyright by Jennifer Ratcliffe | Photograph Copyright by Jennifer Ratcliffe |
The following sections describe the processes I used to dye with the weld that I grew and harvested.
- Weld: 56.7 grams (2 oz) for each 114 grams (4 oz) of yarn or fabric was used as a basic guide
- Water: The water source in this study has been water from my tap; it has a neutral pH of 7
- Mordants: Alum, Copper*, Iron, Tin* and Tannin
- Yarn: Wool, Silk, Linen
- Fabric: Kona Cotton and 100% Silk
- Dye Pots: Large stainless steel pots that hold between 5 & 8 gallons
- Stainless steel spoons & stirring sticks
- Measuring Spoons
- Thermometer
- Cheesecloth, small whisk, fine sieve to help dissolve tannin
- Drying rack
Protein Fibers - Preparation and Cleaning
Yarn and fabric were given a 30-minute soak in hot tap-water and a grease-removing dish soap, followed with a tap-water rinse that was of similar temperature. Water was squeezed out and the goods were hung across a clothes rack to dry then labeled and stored until ready for use.
Mordanting Protein Fibers
| Pre-Mordant | Fiber Used | Weight of Goods | Weight of Mordant |
| Alum | Wool | 266.80 Grams | 43 Grams |
| Alum | Silk | 113.4 Grams | 21 Grams |
| Copper Sulfate* | Wool | 266 Grams | 7 Grams |
| Tin* | Wool | 113 Grams | 3.5 Grams |
| Tin* | Silk | 113 Grams | 1.78 Grams |
- Wet fibers completely
- Fill dye-pot with water so the goods can move freely
- Add mordant, stir to dissolve
- Turn stove on to medium/high heat
- Squeeze the excess water out of the goods and add them to the pot
- Slowly bring to a simmer (180-200°F) and remain there for an hour, stirring periodically
- Turn off heat and let sit over-night, stirring occasionally
- Rinse and use immediately or dry, label and store in a dark place
I used iron as a post-mordant for a small, tightly hand-spun skein of wool crewel yarn, but iron has a reputation for making yarn harsh.
| Post-Mordant | Fiber Used | Weight of Goods | Weight of Mordant |
| Iron | Wool | 1.78 Grams | 14 Grams |
Bast Fibers
Bast fibers have a natural wax that needs to be extracted for an even, consistent dye.
For approximately 226 grams (8oz) of fiber/yarn/fabric, you will need
- 2 tablespoons Washing Soda
- 1/8 teaspoon grease-removing dish washing liquid
Use a large pot—one big enough for the goods to move freely in
- Fill pot with water and dissolve the washing soda and dish washing liquid
- Add items to be scoured
- Raise the temperature of the water to boiling. Lower to a simmer and maintain for 30-minutes, longer if it's a large skein or yardage; Repeat if the water is gray/dirty enough to warrant it
- Occasionally stir the goods gently so they don't sit on the bottom of the pot for any length of time
- Remove yarn or fabric from the hot water, drain and allow to cool slightly before rinsing in very warm water.
- Dry, label and store until ready to dye
Note: I scour yarn separately from fabric, as stirring/folding often allows for better results and yarn could easily tangle in the fabric
Mordanting Bast Fibers or Fabric
There's an old saying, "Why fix it if it isn't broken?" I learned the following technique from The Art and Craft of Natural Dyeing by Jim Niles; it works beautifully. It is a multi-step, three-day process for approximately 226 grams or 8 oz of goods.
Ingredients:
- 113.4 grams (4 oz) Alum
- 28 grams (1 oz) Washing Soda
- 14 grams (1/2 oz) Tannic Acid
Day 1
- Weigh scoured dry yarn or fabric
- Add yarn or fabric to a container filled with enough water to cover and allow the goods to get completely wet
- Fill a large pot with water so that the goods will have room to float around
- Weigh 56.7 grams (2 oz) of alum and 14 grams (1/2 oz) of washing soda Add it to the pot filled with water and stir to dissolve
- Turn stove to medium/medium-high heat
- Squeeze out extra water and add goods to pot
- Slowly bring to a simmer (180-200°F). After an hour, turn off the heat and allow to cool overnight, stirring periodically
Day 2
- Remove goods from alum water, allow to drain, rinse the pot
- Refill the pot about half way with warm water
Note: Filling the pot only half way with water allows whisking the tannin to dissolve without splashing the water all over the work surface (and the dyer)
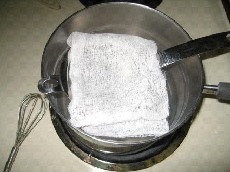
- In a glass measuring cup, add 1-cup boiling water to 14 grams (½ oz) tannic acid.
- Use a whisk to help dissolve the tannic acid. Line a fine sieve with cheesecloth to strain mixture into the pot. Any tannic acid particles left un-dissolved will leave spots on whatever you're dyeing that cannot be removed.
- Add enough water to cover the goods and allow them to move freely
- Squeeze excess alum water from the goods, add to the pot and slowly bring to a simmer, stirring periodically. Keep the temperature between 180°F and 200°F for an hour
- Remove from heat and allow to cool overnight. Stir occasionally, especially before bed and first thing in the morning
Day 3
- Remove goods from mordant pot, rinse and repeat the process for Day 1
Finishing
- Goods are now ready to be dyed. Squeeze excess water from the mordanted goods. Use immediately or allow to dry, label and store until ready to use
Extract the Dye
- Place 56 grams (2 oz) of weld in the center of a piece of cheese cloth large enough to hold it loosely. Tie, knot or use rubber bands to secure the sack
- Fill a dye pot to 3/4 full with water. Put the weld sack in, squeeze the water through the weld
- Bring to a simmer (180-200°F) and hold at that temperature for one hour. Try not to boil it, as boiling brings out the browns from the plant material
- The dye can be used immediately or the weld can steep in the pot overnight. It can be kept refrigerated for about a week
Dyeing
During the time the weld was growing, I had spun lots of yarn. Different fibers along with different mordants all using weld would surely give me a wide variety of "yellow." The historical research and documentation I did confirmed each of the fibers I spun were used in western Europe during the medieval period of history.
For instance, the yarn in the dye pot shown below is a skein of Masham yarn. The breed of sheep is on the endangered list and although a beautiful sheep to look at, the breed has short guard hair that not only flies all over the floor while being spun, it is not a cozy yarn you want up against your body. This skein tested my skills to get a consistently "thick" yarn. The result is that Masham takes up weld beautifully.
| Filtering-out undisolved tanic acid | Masham yarn in the dye pot |
 |
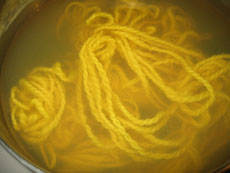 |
| Photograph Copyright by Jennifer Ratcliffe | Photograph Copyright by Jennifer Ratcliffe |
The Process
- If using hot dye liquid, slowly heat the goods in a separate pot of water to approximately the same temperature as the dye before adding to the dye pot
- Bring the dye pot to a 180-200°F; stir periodically for one hour
- Turn off the heat and leave over night if possible
- Strain the dye liquid into another dye pot in case the dye has not exhausted
- When the yarn/fabric is cool enough to handle, start the rinse in water that is the same temperature as the dyed goods and rinse in progressively cooler water until the water runs clear
- Lay yarns and/or fabrics flat to dry
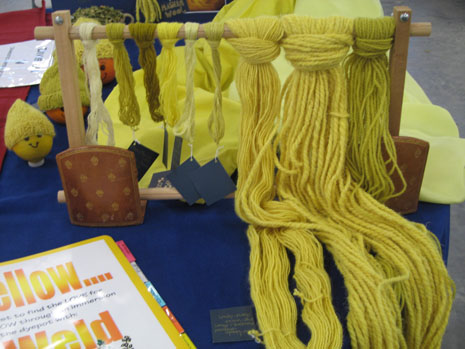
Small Skeins on the dowel, left to right:
| 2-Ply Merino Wool Crewel Yarn, Alum/Weld Exhaust Bath | |
| 2-Ply Merino wool Crewel Yarn, Copper/Weld | |
| 2-Ply Merino wool Crewel Yarn, Weld/Iron (added at end of dye bath) | |
| 2-Ply Merino wool Crewel Yarn, Alum/Weld | |
| 2-Ply Lincoln Longwool Crewel Yarn, Alum/ Weld Exhaust Bath | |
| 2-Ply Merino wool Crewel Yarn, Tin/Weld |
Large Skeins on the Dowel, left to right:
| 2-Ply Lincoln Longwool, Alum/Weld | |
| 2-Ply Masham, Alum/Weld | |
| 2-Ply Polypay/Romney cross that I raised when I lived in western NY and then spun at a mill in Vermont, Copper/Weld |
There are two fabrics in the background of the picture above—the one on the left if 100% Kona Cotton from Dharma Trading that was washed first with Purex laundry detergent, rinsed, and then a second time with Synthropol, then rinsed before mordanting and dyeing. The one on the right is 100% silk twill fabric that was washed with Synthropol, then rinsed before mordanting and dyeing.
I live in Florida, so what better way to show how a yarn will work-up, than by knitting little caps for Florida Citrus! The littlest one in front was knit with the Lincoln Longwool and is on a lemon. The cap on the orange is from the Polypay-Romney cross, and further back is a cap from the Masham wool on a grapefruit.
The quest to find "love" for yellow was long, but I enjoyed every minute of it. After all that yellow, I still can't say I love yellow; I like it—sort of. I learned a lot, gave a lot of weld and weld-dyed things away, and managed to make a yellow dress which might have gotten me to Step 5 of the "12-Steps To Loving Yellow."
My conclusion: The best thing about yellow is that it can (and will) be over-dyed—bring on the indigo!
Further Reading
Buchanan, Rita. A Dyer's Garden. Denver, Colorado: Interweave Press, 1995.
Dalby, Gill. Natural Dyes for Vegetable Fibres. Somerset, England: Ashill Publications, 1992.
Davidson, Mary Frances. The Dye Pot. Gatlinburg, Tennessee: Self Published.
Finley, Victoria. Color A Natural History of the Palette. New York, New York: Random House Trade, 2002.
Liles, J.N. Art & Craft of Natural Dyeing. Knoxville, Tennessee: The University of Tennessee Press, 1990.
Roth, Bettie G., Chris Schulz. Handbook of Timesaving Tables for Weavers, Spinners and Dyers. Elk Grove, California: Roth/Schulz Publishing, 1991.
Rudkin, Linda. Natural Dyes. London, England: A & C Black Publishers, 2007.
Vester, Paula. Textile History. Stone Mountain, Georgia: Self Published, 1995.
Internet Sites
www.Sheep101.info. Excellent source of information regarding most breeds of sheep. It is also where I obtained the pictures of the breeds I used in this study.
Materials Sources
Aurora Silk. Master Dyer, Cheryl Lynn Kolander Williams is the author of many dye manuals and technical information as well as the purveyor of beautiful fibers.
Dharma Trading. Good source of dyes and PFD (prepared for dyeing) fabrics and finished goods.
Frontier Natural Products Co-Op. Dyes and assists.
Fabric-Store.com. Good source of inexpensive linen fabric.
Louet Euroflax. Flax seeds and fibers among many other items.
Treenwaysilks.com. Silk bricks and other luscious fibers.
* While we appreciate the experimentation the Jennifer has done, the Turkey Red Journal discourages the use of tin, copper and chromium mordants.