 Turkey Red Journal
Introduction to Common New Mexico Dye Lichens
By Glenna Dean
What is a lichen? (pronounced "lye-kin")
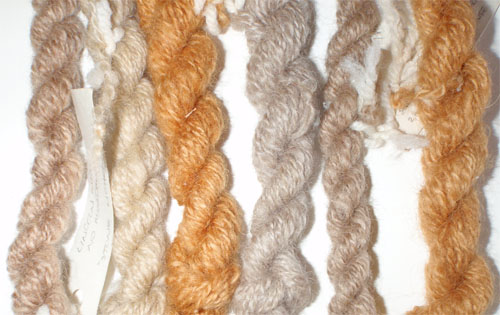
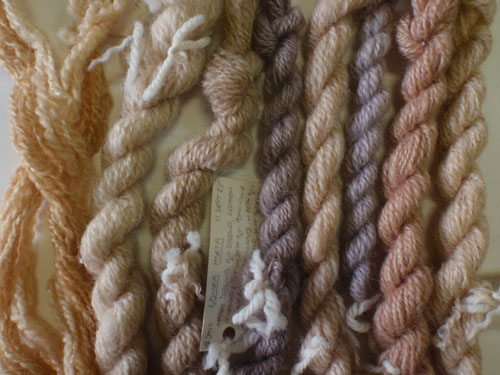
Only about three or four kinds of lichens are relatively common in New Mexico, and even these are not really abundant. By using all four dye-extraction methods described below, any New Mexico lichen can yield up to four different colors in ranges of browns, tans, khakis, yellows, beiges, rosy beiges, lavenders, and plum.
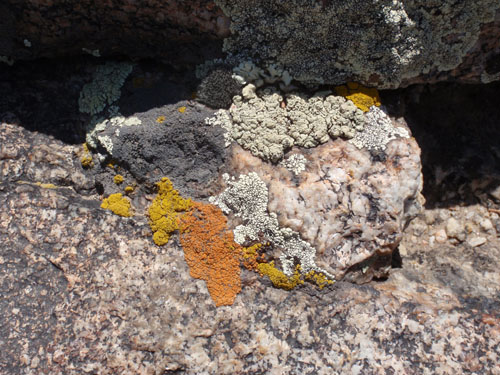
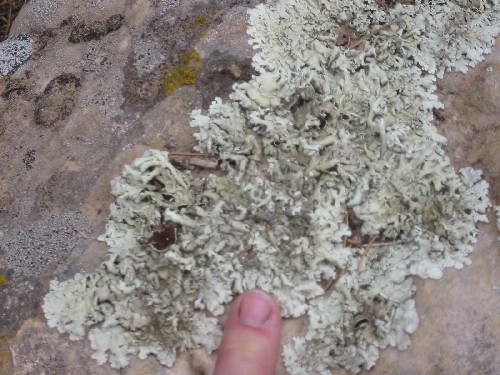
What do lichens look like? 1) Xanthoparmelia: foliose "shield lichens," grow on rocks and can be found where they have fallen on the ground next to a rock. These lichens are also the "moss" on the "moss rock" used for landscaping. Shield lichens can yield orange browns, medium browns, and tans.
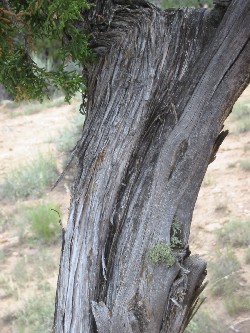
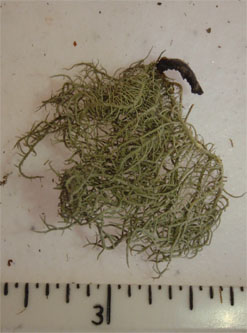
2) Usnea: fruticose "beard lichens," are common on piñons and junipers, and on spruce and fir trees in the mountains above about 7500 feet elevation. They can also be found on firewood and the small trees used for coyote fences. Beard lichens can yield lavenders, rosy beiges, and tans.
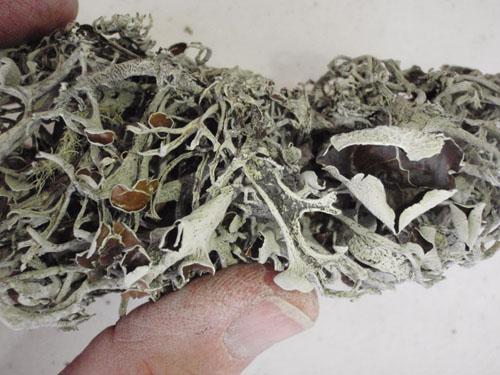
3) Pseudevernia: foliose "antler lichens," grow on spruce and fir trees in the mountains above an elevation of about 7500 feet and can be found on fallen branches. Antler lichens can yield plums, light browns, and tans.
Collecting Lichens You might find more than one kind of lichen on the forest floor. Separate the different kinds of lichen, and their dye extractions—this way you will get a broader color palette.
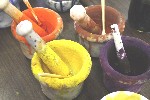
Extracting Lichen Dyes 1) Boiling water extraction. Actually, the water should never boil, but rather should simmer. Cover a handful of lichen with acidified water (add a little vinegar to a half-gallon of water, to bring it to a pH of about 5-6) and simmer, covered for an hour or so to extract the dye. Dye extraction can involve heating, then cooling for several hours or overnight, then heating again. The water might turn a color, or it might not; any color the water turns might relate to the actual dye color, or it might not. Longer heating tends to bring out more of the brown tones that are part of most lichen colors. If the lichen you are extracting gives brown anyway, you can use longer heating to get the most dye out of your dyestuff. After the dye is extracted, remove the lichen mass, rinse in a colander and go on to method 3, below.
2) Fermentation. This is the term for extended soaking in an alkaline solution, covered, at room temperature; no yeast is involved. Use a solution of household ammonia (3 parts water to 1 part ammonia), instead of stale urine, as in the old days. Plain ammonia works best; although the "lemon" and "sudsy" formulations will work, they smell peculiar or foam in the dyepot. Summer temperatures in New Mexico are too hot to put the lichen fermentation jars in the sun, as recommended in some dye books—the heat will greatly weaken or even destroy the dye.
Put a handful of lichen into a glass jar and cover generously with ammonia solution, but do not fill the jar. Gallon pickle or mason jars are great if you get serious about lichen dyes. Cover the mouth of the jar with a square of plastic cut from a zip-loc plastic bag and then screw on the lid. This will protect the metal of the lid from the ammonia fumes, and the lichen dye from the metals in the lid. Three times a day, vigorously tip the jar back and forth (this takes the place of the "stirring" mentioned in the books)—you'll get lots of foam. Keep doing this three times a day for about a week. Thereafter, vigorously tip the jar one to two times a day—you'll get less foam and it will dissipate quickly. The ammonia solution might turn a color, or it might not; any color the solution turns might relate to the actual dye color, or it might not. A clear or milky solution, for instance, often yields lavender in the dyepot. The dye is ready at any point after the foam starts to break down quickly (usually within two to four weeks). Some dyers have kept lichens in fermentation jars for years with no apparent harm to the dye.
3) Secondary Extraction A. Lichens can be coaxed to yield the maximum amount of color using this method, and a third or fourth color is usually the reward. The method works by first extracting dye from a handful of lichen with simmering water (method 1), removing and rinsing the lichen with water using a colander, and then extracting dye from that same handful of lichen by fermentation in a jar (method 2). The ammonia solution might turn a color, or it might not; any color the solution turns might relate to the actual dye color, or it might not.
4) Secondary Extraction B. The method works by first extracting dye from a handful of lichen by fermentation in a jar (method 2), removing and rinsing the lichen with water using a colander, and then extracting dye from that same handful of lichen by simmering water (method 1). The water might turn a color, or it might not; any color the water turns might relate to the actual dye color, or it might not.
Secondary extraction seems to work best with simmered lichens going into fermentation (Secondary Extraction A), although sometimes a fourth color can be obtained by going from fermentation into simmering water (Secondary Extraction B).
Lichens as Dye Sources Dyeing with Lichen Dyes You can shift acidic water-extracted lichen dyes to bluer tones by adding ammonia, baking soda, or washing soda to the make the dyebath slightly alkaline. On the other hand, neutralize a fermented dyebath with vinegar before you start dyeing your fiber. As a rough guide, use twice as much household vinegar as fermented dye liquor to bring the dyebath to neutral (example: 2 cups of 5% household vinegar to 1 cup fermented dye liquor). Fermented dyes can create redder tones by adding enough extra vinegar to make the dyebath acidic.
Generally speaking, simmer your fiber or yarn in the dyebath for an hour. Bright or clear colors such as lavender should be removed from the dyebath and rinsed as soon as you are satisfied with the color you see. Brown colors often need to be heated, cooled, and reheated to get the depth of color desired. Because the color you see in the dyebath is probably not the color of the real dye, the color of the dyebath won't necessarily change when all of the dye has developed on the fiber. Rinse the dyed fiber and dry away from direct sunlight.
Lichens can be dried and stored in paper bags for long periods of time and extracted dyes can be frozen for future use (especially if the dyes were extracted by the multiple methods described above). Different wools will take the colors differently and colors can be shifted by changing the pH of the dye bath. Some lichen colors impart a lingering fragrance to the wool—an entirely wonderful experience. Once you start working with lichens, you will develop an instinct for the colors they will yield. Outdoors, you'll eventually be able to smell some lichens before you see them! How's that for another dimension for a walk in the woods?
Glenna Dean holds advanced degrees in archeology and botany and is trained as an archaeobotanist. She specialized in the identification and analysis of pollen grains from archeological artifacts (like grinding stones and pottery vessels), the identification of burned seeds and broken plant parts, and technological analysis of textiles, sandals, and other artifacts made from plant or animal fibers. Cotton was grown in the American Southwest before Columbus, and 700-year-old cotton textiles are still bright with red, black, and yellow colors. Glenna's search for possible sources for the ancient dyes turned into a study of natural dyeing—and a passion all its own.
A fungus?
partly
A bacterium or a species of algae?
partly
Both?
yes, lichens are symbiotic organisms
Photosynthetic organisms?
yes
Parasitic organisms?
no
Used for food, medicine, perfume, dyes?
yes
Easily over-collected?
yes
Rarely have other than Latin names?
yes
• Lichens can be crustose: crust-like, stuck too tightly to the surface (rock, concrete, bark) to remove—these are not dye plants!
• Lichens can be foliose: leaf-like, having a distinct upper surface and a lower surface.
• Lichens can be fruticose: like little bushes or hair.
Usnea sp on a juniper tree
Usnea sp, Beard Lichen
Photograph Copyright by Glenna Dean
Photograph Copyright by Glenna Dean
Look on the ground for lichens that have fallen from trees or rocks, or check out your woodpile for lichens that have been brought in with firewood. No one really knows how long it takes lichens to grow, but the consensus is that it's SLOW, measured in terms of a human lifetime. Collecting fallen lichens is the best way to avoid over-collecting lichens in their natural habitat. After you've finished collecting in an area, there shouldn't be any signs that you were ever there. Put the fallen lichens in paper bags so they won't rot before you get around to working with them. You might find more than one kind of lichen on the forest floor. Separate the different kinds of lichen, and their dye extractions—this way you will get a broader color palette.
There are four main ways to extract lichen dyes:
• Lichens dye protein fibers–wool silk, etc.
• Lichen dyes are substantive–no mordant needed
• Lichen dye acids are invisible–color of dyebath might not have anything to do with the final color
• Overheating a dye pot can brown out the color
• Some lichen dyes are sensitive to light, others (typically the browns) are very light-fast
Lichen dyes don't need a mordant to bind to the protein material (such as wool and silk) being dyed, but mordants can change the colors of some dyes. It's hard to say how much lichen it takes to dye a given quantity of protein fiber—equal amounts of lichen and fiber are probably the way to start, but the brown colors go farther than the other water-extracted colors, and the fermented extractions go even farther. If you do secondary extractions (method 3A and 3B, above), you can get the most color from a scarce dyestuff. The dyes obtained from fermentation are very concentrated, with perhaps a cup of dye liquor dispersed in an entire dyebath for a half-ounce or more of fiber.